15 Unique Ideas For Your Trending Nails Designs 3D In 2021
We know you love your weekly frenzy, but are you tired of the old pale pink, nude or black colours? If you’re feeling daring, you can always try bright red or blue, but why not choose something more glamorous? If you want to make your nails stand out, then 3D nail art is here to fulfil your manicure prayers. From floral designs to simple studs, three-dimensional nails have never been better. Here, we have selected the best 3D nail designs to inspire your next manicure.
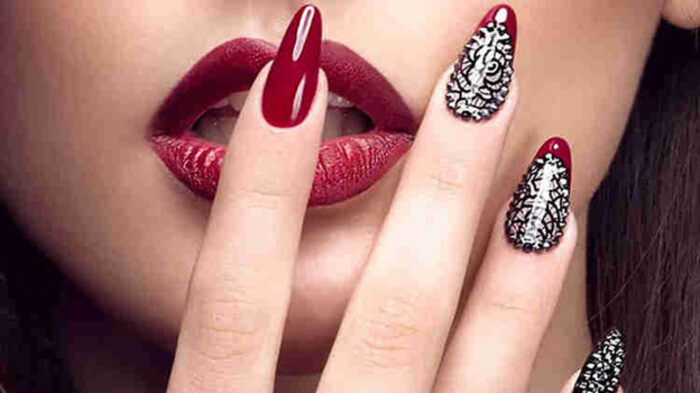
- 3D lace nails
The lace 3D nail design is a great choice as you can have the spacing or covering you want. To start, pick your base colour and grab some lace. The design resembles a regular lace nail, except that instead of painting the material and peeling it off, you stick it onto your nail, creating a 3D texture that pops out.
- 3D Unicorn nails
Everything unicorn is arguably one of the biggest trends of the last century. So why should you strip your nails for mystical makeup? Try out this striking sparkle design with unicorn horn nails.
Why should your ring be your only gift for your special day? 3D fingernails may not be a luxury bride, but they can stand out in ring close-ups when made simply.
- 3D Snowflakes Nail Art
A frosty and cute nail design with 3D snowflakes will welcome winter weather with open arms. For the look, start with a blue background layer before adding your white scales.
- 3D bridal nails
Why should your ring be your only gift for your special day? 3D fingernails may not be a luxury bride, but they can stand out in ring close-ups when made simply.
- 3D rose nail art
Rose is another spot on stunning 3D flower nails. We love a lovely pink rose design with leaf details for a fresh and youthful alternative to the classic red rose style.
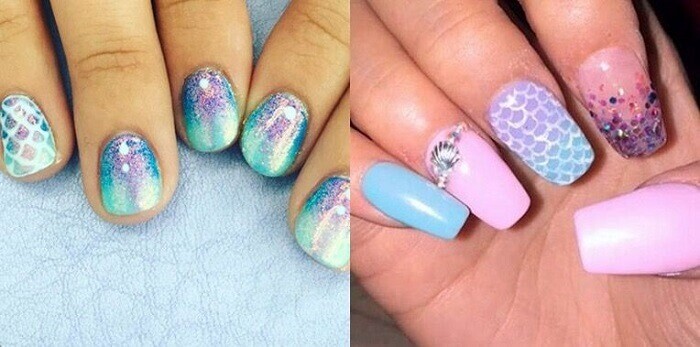
- Mermaid 3D nails
Arouse your inner whistle to the sea with this blue jewel design.
- DIY 3D manicure
Making your own 3D manicure at home is surprisingly easy. Just grab nail glue and brush and activate your Pinterest account. While there are various styles to try, the one with studs is the easiest, so consider starting with them if you’re a beginner.
- French-style 3D nails
For a feminine and elegant look, try a French male hairstyle with 3D flowers. Gorgeous white flowers are sure to add a modern and trendy touch to your classic French tips.
- Gem-studded 3D nails
If subtlety isn’t your thing, do something a little lighter. From letters to jewellery and even necklaces, there’s no limit to the 3D elements you can attach to your fingernails, so get creative and relax.
- Simple 3D nails
For something a little more subtle, try a simple 3D nude manicure. Nude tones are very versatile and can suit any occasion. So even with some extra subtle silver or white trim, they’ll still look classy and consistent.
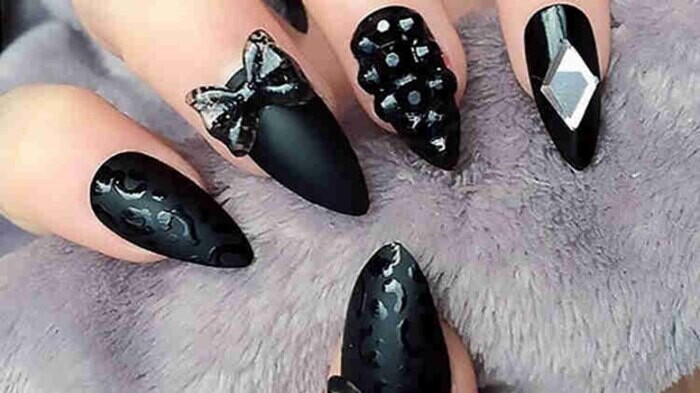
- 3D matte nails
A simple 3D element can blow new life into the classic matte finish. For a bold chic look, try pairing black nail polish with a black bow and studs.
- Glossy 3D nails
Matte is adorable, but sometimes a girl needs to shine. Nail polish is always a little fun, and even more so with a bit of 3D functionality. Try a beautiful navy blue gloss with a few glitter beads for a bit of sparkle.
- Gold 3D nails
Do you want to take your glamorous golden nails to the next level? Try adding some 3D decorations, such as studs or diamontes.
- Coffin nails with 3D design
Like 3D details, coffin nails are also a trend today. So why not combine the two? You can choose something to cover on top or a simple manicure. The sky is the limit with these extra long hooves.
- Ombre 3D nails
Ombre has long been a favourite nail design, but it’s starting to fade away. For a fresh feel to ombre hair, try adding some flowers or 3D sequins.
- 30 3D nail designs to take your nails to the next level
Girls, would you like to highlight your nails? The 3D nail salon trend is a fun way to add glamourmoulds to your nails for special occasions. Taking conventional manicures to the next level, this trend uses gems, rhinestones, petals, flowers, pearls, bows, hearts and other fun decorations to accentuate the fun out of you immediately. Nail art is usually created using acrylic nails, but certain styles can also be created on natural nails. The market has many moulds and other materials that you can use to create 3D nail art.
We’ve put together a list of the 30 best designs you can recreate. If you are looking for interesting DIY ideas and ideas, keep reading!
- 3D firm emerald-toned nails
This royal design uses two-tone nail polish and several jewels to create this exclusive look. If you’re looking for a picky nail art idea, you have to try to recreate this look.
What you will need
- Two-tone nail polish
- Nail art jewellery colour
- rivet
- Polished clear
Instruction
- Start by choosing the right two-tone nail polish. You can also use a dark colour with shimmer instead. Apply two classes of the base.
- To decorate the ring nails, apply a clear polish layer and use nail tweezers to place the jewellery. Make sure you start with bigger gems.
- Use small studs to contour and decorate other nails.
- Apply a top coat to fix the nail.
- Nail Art 3D Sea Blue for the summer
This coral blue looks so refreshing and cool! It’s perfect for summer or when you’re on vacation. The starfish is intricately made, but it’s quite simple to reproduce.
What you will need
- Coral blue nail polish
- White nail polish
- A sponge
- Acrylic mixture
- Polished clear
Instruction
- Choose a coral-blue nail polish and paint on the bottom half of the nail.
- Cover your piercings with white glossy paint. Use a small, gently blended sponge where two shades meet to create an effect in the picture.
- Use a mixture of white acrylic to layer stars on your nails.
- Take the small white acrylic beads and place them on the starfish.
- Use a varnish or clear glue to fix the studs and gems to decorate the ring nails.
- Protect nails with a varnish.
- 3D Cable Knit Sweater Nail Art
This nail art gives your nails a 3D effect. It is very minimalistic and luxurious. Besides, girls with both short or long nails can use this design.
What you will need
- Nude colour nail polish
- Acrylic mixture
- Polished clear
- Nail tweezers
Instruction
- Paint your nails with nude nail polish. Maybelline Super Stay in the shadow ‘Beige Touch’ is a good choice.
- To create acrylic designs, use a white acrylic blend and dip the pieces into the same nail polish you used for the foundation.
- Apply a layer of clear gloss paint, and while it’s still wet, start placing small design pieces on your nails with the help of nail tweezers.
- The last step, apply a coat of paint on top (use matte topcoat to effect in the image).
- 3D beige nails
If you want to choose a fairly modest nail set, then this 3D beige nail template is the right choice. It mostly decorated the ring finger with silver trim details and a cute white acrylic flower. Besides that, beige is a versatile shade!
What you will need
- Beige nail polish
- Acrylic mixture
- Nail tweezers
- Polished clear
Instruction
- The first step is to find the right beige colour for your nails. The beige used in the design ranges between pale pink and nude. Start by painting your nails with 2 coats of polish.
- To create flowers, use a white acrylic mixture. Start with the centre and make your way with the petals by making vertical indents on the acrylic.
- With the help of nail tweezers, add silver or gems on and around the flower. You can use coating or glue to hold the pieces together.
- Be sure to apply a layer of inner nail polish to get the shiny look and preserve the décor.
- Nail Art 3D Pink And Gold
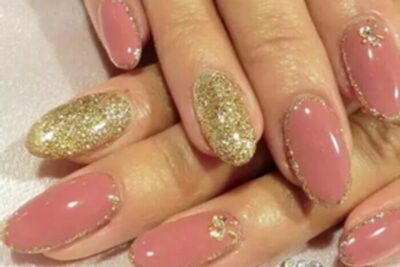
Gold and rose, anyone? Just look at how interesting the combination looks. It’s classy, classy, and a very versatile design. If you like to keep it fancy, then this one is perfect for you.
What you will need
- Rose nail polish
- Yellow nail polish
- Silver studs
- Clear nail polish
Instruction
- Start by painting your nails (except ring nails) in a light pink colour. Colorbar nail polish in the shade ‘Rose Quartz’ is a similar shade.
- Use yellow nail polish with a thin brush to contour the edges.
- Gold ring nail polish.
- Cover with clear gloss paint and put silver studs on top.
- Complete the look with a topcoat.
Great! You’ve created irresistible almond-shaped pink and gold nails!
- Black and gold 3D plaid nail art
These black and gold nails are gorgeous and will make you stand out from the crowd. It also looks good on short nails and requires little maintenance. It’s also simple to do.
What you will need
- Black nail polish
- Gold studs
- Nail tweezers
- Glitter
- Polished clear
Instruction
- Apply two coats of black nail polish for your foundation.
- Cover with clear gloss paint.
- While the clear gloss is still wet, start placing golden nails (using nail tweezers) from the tips of your nails to create a checkered pattern.
- For the thumb, add a little sparkle and sparkle on the top and stick a heart-shaped rivet on the base.
- Paint on clear gloss!
- Colorful Sequin 3D Nail Art
This sequin-inspired nail art is simple and colourful! Also, the smooth sole complements the sequins beautifully. You can also choose to go with a sequin colour like silver or gold if you prefer that way.
What you will need
- Nude colour nail polish
- Sequins
- Silver studs
- Clear nail polish
Instruction
- For the base layer, apply two coats of nude nail polish. The Maybelline Color Show nail polish ‘Nude Skin’ is a great choice.
- Apply a layer of transparent polish to the nails, then put the sequins and silver studs on top while the nail is still wet.
- Polish the look with varnished nail polish.
You achieve great nails in just 3 steps!
- Silver Winter Nails
A little shimmering polish and silver studs can help make an ordinary set of nails special. It’s like winter on your nails. To recreate this look, follow the steps.
What you will need
- Gray nail polish
- Silver sparkling polish
- Silver studs
- Polished clear
Instruction
- Start with white nail polish with grey tones.
- For your index and little fingers, use sparkling silver nail polish.
- Paint a transparent gloss finish.
- Place the silver nails on the nail, while the clear polish is still wet.
- Finally, top it with a glossy finish.
- 3D nails with dark green jade
There’s something so mellow about this blue. It was hauntingly, dark and beautiful. On top of that, silver jewels are creating such a perfect design – it’s a must-try!
What you will need
- Nail polish dark green
- Clear nail polish
- Silver studs
Instruction
- Start by painting your nails with dark blue colour as shown in the picture. Colorbar Nail Lacquer ‘Blue Lagoon’ colour is something you can use.
- Apply a layer of clear nail polish.
- Right angle line with silver studs.
- You can add smaller studs on and around the larger studs for even more glam.
- Finish with a good gloss paint finish!
- 3D vanilla and strawberry nail art
This design reminds me of strawberry sorbet. It is a very delicate combination of pale pink, white and a little sparkle. Besides, it is straightforward to recreate.
What you will need
- Pink nail polish
- Thin brush
- Glitter polish
- Polished clear
Instruction
- Start by painting your nails with two coats of “Princess Rule” in the shade of ‘Princess Rule ‘for pink and white for your ring nails.
- Use a thin brush to create stripes on the ring nail with polish.
- Apply a glossy finish to your nails!
Isn’t that a simple 3-step process?
- 3D Jewels And Soft Nail Art
Lightweight and super nice minimalistic design. Silver diamonds complement the beautiful pale pink jewellery colour. If you prefer brighter tones to your nails with a hint of blue, then remove yourself.
What you will need
- Pink nail polish
- Jelly
- Pearl
- Clear nail polish
Instruction
- Apply two coats of nail polish. O.P.I Nail Lacquer in the shade ‘In the Spotlight, Pink’ is a great choice.
- Choose the nail you want to focus on (while you can also do it on any nail you want!).
- Paint a transparent gloss finish.
- Organize the stones and pearls aesthetically on the nail.
- Apply one coat of varnish on top to finish.
- Beautiful 3D black nail art
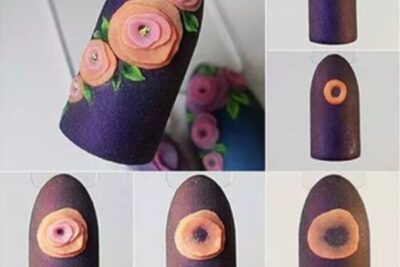
The look is mesmerizing! The matte black base makes the design even more unique. It is effortless to recreate. You can even opt for glossy black nail polish instead of your used glossy polish. The design has been covered by you this fall!
What you will need
- Black nail polish
- Acrylic nails
- Acrylic mixture
- Sparkling gold
- Green nail polish
- Polish is clear
Instruction
- Start with black acrylic nail polish.
- To make a flower, place a small ball of the orange acrylic mixture on top of the nail, as shown in the picture. (Note: You can also use yellow or another colour as you like instead of orange.)
- Use a pin or needle to make a small hole in the centre aluminium of the ball.
- Use a brush to gently spread the ring to create a thin layer of petals.
- Repeat the process until you have the desired number of petals.
- You can use gold glitter in the centre of the flower to highlight it.
- Paint green nails with a nail brush to shape the leaves.
- Oreo acrylic 3D flower nails
This trendy design is fun to create. It features classic black and white combinations with polka dots and acrylic. You can choose to recreate this look at just your ring fingernail if you want to opt for a cleaner look. You can leave the other nails intact (or put a few polka dots).
What you will need
- Black nail polish
- White nail polish
- Acrylic mixture
- A thin brush
- Polished clear
Instruction
- For the base coat, apply two coats of black nail polish.
- To create acrylic flowers, spread a sheet of aluminium foil and place some white acrylic mixture on top of it.
- Create circles and arrange them in turn until it becomes a full flower, as you can see in the image.
- For smaller flowers, repeat the same process, with only the smaller circle pattern.
- Using a thin brush, create white stripes and polka dots on the nail.
- Apply a layer of clear polish and place the flower you created over the white stripes.
- Let it set.
- Violet Acrylics 3D Nail Art
This enchanting nail art is great for any season. The pale pink flowers above are quite delicate. You can choose to recreate this look just on your ring nails instead of all of your fingernails.
What you will need
- Purple nail polish
- Acrylic mixture
- Aluminium foil
- Needle or pin
- Polished clear
Instruction
- Start by painting your nails purple. Depending on your preference, you can choose between a gel or matte nail polish.
- To create petals, use a specific glossy pink acrylic mixture. Take a small tablet of the mixture and place it on an aluminium foil.
- The thin petals should be delicately layered, this layer overlapping.
- To create the flower centre, take the pink acrylic mixture’s ball and place it on the nail in the flower centre.
- Press lightly in the centre to achieve a specific look.
- Use a needle or pin to create swirls.
You have mastered the design!
- Nail Art 3D Sunflower
This look includes a lovely translucent lavender shade, some sparkling silver and sunflowers. It is a lovely and gentle pastel shade. You can even use it to brighten up your rainy / winter days.
What you will need
- Lavender nail polish
- Glitter polish
- Acrylic mixture
- Polished clear
Instruction
- Start by painting your nails with lavender nail polish. The Maybelline Color Show shade in the Blackcurrent Pop shade is quite similar to this one.
- 3D art is minimalistic and done only on the ring finger, so only sparkling paint for the ring finger.
- To shape a sunflower, start at the centre by taking a small ball with the brown acrylic mixture and placing it on the nail.
- To draw the petals, take a small ball mixed with the yellow acrylic mixture, place it on the nail and create a vertical indentation for each petal.
- Finally, stamp your deals with glossy paint!
- French style nail art 3D
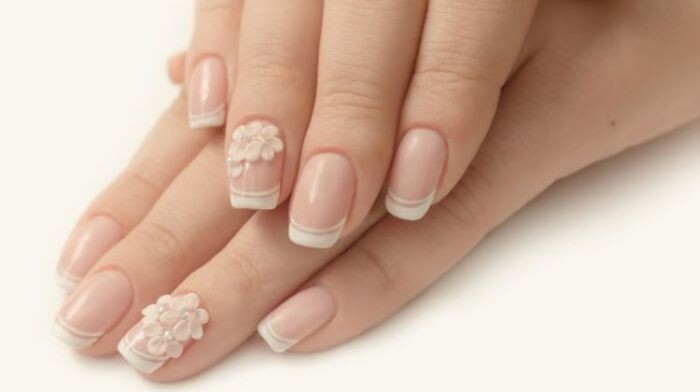
This versatile French 3D men’s shoe looks super feminine and elegant. If you want to add an extra touch to your usual French look, this look is for you! Lovely white flowers and silver studs complete the luxurious look.
What you will need
- Nail polish pale pink or nude
- Sparkling
- Acrylic mixture
- Polished clear
Instruction
- Choose a clear or pale pink or nude nail polish for your foundation and apply it in two coats.
- For the tips, use a white polish and create a crescent to make the tips pop.
- You can also use some shimmer on the edges.
- For the petals, use a white acrylic mixture. Place a small ball of the mixture on the nail and create longitudinal indentations to elongate the edges.
- After the petals are finished, polish them transparent or glue the silver nails to the flowers’ centres.
- Finish off by applying a top coat and allow to dry.
- 3D rose nail art design
This pastel pink 3D flower arrangement uses the basic buoyancy technique. Unlike 3D nail art made separately from the nail, embossing is a design that emerges from the nail itself.
What you will need
- Nail polish pink chalk
- Acrylic mixture
- Brush
- Rose jelly
- Polished clear
Instruction
- Start by painting your nails a pink rose colour. Maybelline Super Strong Gel 130 Rose Poudre nail polish has a very nice faint pink colour.
- Pick a small ball of light pink acrylic and place it on the nail. Make a dent in the centre. Create rose petals by making small Cs around the circular indent.
- Create the leaves using a white acrylic blend and add pink jellies to give the nail a look.
- Don’t forget to top with a clear gloss finish for the look.
- Christmas 3D nail art
Or are you in the holiday mood? Well then, this 3D X-mas nail art is a quick and easy way to decorate your nails and celebrate the festive season. We all love good old golden nails from time to time. This design uses a gold sole and some fancy decorations to lift your nails to the next level.
What you will need
- Yellow nail polish
- Red studs
- Green nail polish
- Polished clear
- Nail tweezers
- Thin brush
Instruction
- Start by painting your nails with beautiful glossy gold colour.
- Clear polish or glue to stick the red studs onto your nails.
- Next, you can use green nail polish with a thin brush to shape the leaves. Nail polish will give the leaves a 3D effect.
- To create leaves, let’s start by creating dots, then joining them.
- Apply a top coat to fix everything.
- 3D Nail Art Snowflakes
This design is another great look for the festive season. Nothing screams Christmas like red and snowflakes, and this is a combination of sweet and merry everything. It also only includes a few steps and can be done on short nails!
What you will need
- Red nail polish
- White nail polish
- Thin brush
- Silver studs
Instruction
- Paint your nails with a bright red colour.
- Use a thin nail brush to create snowflakes and spots on the nails.
- You can use glue or clear polishing glue to fix the silver nails in the centre of each snowflake.
- Put a glossy finish on the new designer’s nails and enjoy the holiday mood!
- Pink and silver sparkling bow
Do you like bling and glitter? This pink and silver shimmer combination with the work on the ring nail is so cute in addition to being a cake. It looks great on short nails as well as on long, manicured nails. If you want to add a bit of glamour and glamour to a dull day, here is your choice.
What you will need
- Glitter pink nail polish
- Sparkling silver nail polish
- Acrylic mixture
- Polished clear
Instruction
- Use sparkling pink nail polish on all nails except ring nails. Maybelline Color Show Glitter Mania Nail Lacquer in ‘Pink Champagne’ or ‘Red Carpet’ are great options.
- For ring nails, use a silver sheen. Maybelline’s ‘Dazzling Diva’ shade is a stunning 3D silver.
- To create the bow, use a pink acrylic blend. Place a medium-sized ball of the mixture on your nail and use a thin brush to create indentations to give the bow precision.
- Paint a nail polish inside and then place the silver nail in the bow’s centre for the highlight.
- Apply a top coat over the topcoat to keep the look intact for longer.
Voila! It’s not as simple as ABC, is it?
- Art Nail 3D Black And Beige Bow
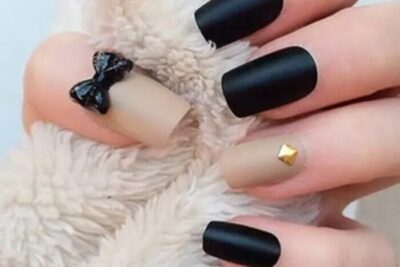
This design uses luxurious matte black and matte black nail polish with gold studs and a small bow on the thumb. As you can see, it’s pretty easy to recreate and is not highly maintainable. So if you’re looking for something achievable and looks like Vogue, keep reading.
What you will need
- Matte black nail polish
- Gold studs
- Acrylic mixture
- Nail polish is a matte finish.
Instruction
- Paint your nails with matte black nail polish. Paint your thumb and ring nails with matte sand beige paint.
- Use glue to fix a gold nail on the ring nail.
- You can create your own acrylic bow on an aluminium foil using the acrylic bow mix or buy commercially made bows.
- Use a matte finish to complete the look. Revlon Nail Enamel Matte Top Coat does an excellent job in finishing nails.
- Purple and green 3D bow tie nails
If you love to keep it unique and fun, then you’ll probably love this cute bow tie nail art. It combines purple and light greens and uses a few polka dots here and there to increase the funky effect.
What you will need
- Purple nail polish
- Acrylic mixture
- Green nail polish
- Polished clear
Instruction
- Paint two layers of purple nail polish. You can use Colorbar’s ‘Classy Orchid’ for the purple colour.
- Create bows, use acrylic blends and create them separately on an aluminium foil (you’ll find such materials on the market too).
- Paint the bows with light green nail polish.
- Make a transparent polish to stick the bow or use glue.
- Add dots according to your preference.
- Put a top coat on top, and you’re done!
- 3D spring floating nail art for short nails
This aqua green nail pattern has a very nice floating effect. Girls who like natural nails can recreate this look with ease. The floating effect is created using different shades of nail polish. If you want to achieve this look, follow the steps.
What you will need
- Nail polish blue
- Nail polish brown
- Light pink nail polish
- A thin brush
- Polished clear
Instruction
- For the base layer, apply two coats of the same shade of green paint. You can use the Nykaa Pastel Nail Enamel in the shade ‘Mint Meringue’.
- Now, using a thin brush and brown nail polish, create the branches of the tree.
- Using white nail polish, make some dots on the branches.
- Use Maybelline Color Show Nail Enamel ‘Pinklicious’ for another circle on the white dots.
- To highlight the flowers, use darker pink nail polish on the white and light pink dots.
- Apply a topcoat.
- You have spring in full bloom right at your fingertips!
- Summer minimal 3D nail art for short nails
This simple design is great for everyone – thanks to girls with short nails!
If you are a low maintenance person but like cute nails, this is the product.
Note: You can choose the colour combination of your choice.
What you will need
- Lavender green nail polish
- Nail polish in orange
- Silver studs
- Polished clear
Instruction
- Paint your nails with lavender-blue nail polish, leaving the middle finger for orange beige.
- To create flowers, you can use the white nail polish a thin brush to create dots.
- Apply a layer of clear nail polish.
- Add silver studs before your paint dries.
- Apply a topcoat.
Now, isn’t that so quick and easy?
- Blue beaded minimum acrylic nails
This minimalistic purple, the blue design is beautiful and great for any occasion. It has a few decorations here and there, making it simple and classy.
What you will need
- Nail polish purple-blue
- Polished clear
- Jelly
- Glitter polish
Instruction
- Start by painting your nails with two coats of purple, blue paint. Maybelline Super Stay Gel ‘Surreal’ nail polish is something you can use to recreate the look.
- Apply a layer of clear nail polish.
- While the transparent varnish is still wet, place the stones gently on top of the nail.
- You can polish the nails with white or sparkling nail polish using a thin brush to add a bit of blue.
- Cover with a single coat for the ultimate finish!
- Nail Art 3D Daisy Summer
This cute nail art can be done in a few simple steps. The bright and goofy design with a cherry red base and stone-studded white flowers. If you prefer to have short nails, you can still do this manicure with elan.
What you will need
- Red nail polish
- Thin brush
- Gold jelly
- Polished clear
Instruction
- Start with a red base. Apply two coats of cherry red nail polish. Maybelline Color Show nail lacquer ‘Downtown Red’ is the ideal choice.
- Using a thin nail brush, dot with white nail polish for the flowers and paint them in. This is the easiest way to create those chrysanthemums.
- Cover with a clear varnish or glue to glue the yellow diamonds in the centre.
- Once all is well and dry, apply a topcoat.
You are ready to go with your new set of chamomile nails!
- 3D Plum Plus artificial nails
This gorgeous, luxurious ripe plum colour overlaid on a few silver-coloured diamonds making this design completely flattened. You don’t like how simple it is and what silver and plum colours look like.
What you will need
- Nail polish in plum grey colours
- Silver jelly
- Clear nail polish
Instruction
- Two coats of ripe, plum gel-based nail polish (O.P.I Nail Lacquer – In The Cable Car-pool Lane).
- Paint a transparent gloss finish.
- While the paint is still wet, arrange the silver diamonds on the tips of the ring nails.
- Add a top coat to add more shine.
- Fuschia 3D Nail Art and Gray Jelly
The Fuschia and grey combination is interesting. Don’t like how simple and simple it is, but the colours stand out? The jellies are a cherry on top!
What you will need
- Fuschia nail polish
- Gray nail polish
- Glitter
- Brush
- Polished clear
Instruction
- Apply two coats of nail polish. You can use the shade ‘Flashbulb Fuschia’ and the light grey shade from O.P.I.
- Cover with clear gloss paint.
- While it’s wet, use a brush to add some sparkle on the top of the ring nail, forming a half-circle.
- Arrange the rhinestones in a semicircle around for glitter.
- Paint on top.
We hope now we’ve helped flood you with new ideas. They are all so beautiful and pretty, so follow the steps and transform your nails from blah to yeah!
Frequently asked questions
What is 3d manicure?
3D manicure is more than just nail polish. It has additional details glued to the nail, such as jewellery, flowers, lace, bow or anything else you can imagine. Then it is usually lacquered to seal to enhance security. Additionally, your nail artist can also use extra gel or acrylic to sculpt shapes, such as unicorn horns or flowers.
How do you do 3d manicure?
With intricate artwork like some 3D designs, it’s best to head over to your favourite nail salon. They will do the manicure as usual and apply a base colour polish to whatever shade or theme you like. Then it’s time for real art. Depending on their skill, they will paste decorations using nail glues or create custom artwork using extra gel or acrylic. Special tools make the process a lot easier, as well as a slow setting product.
What are the 5 basic nail patterns?
The five basic nail shapes are square, oval, circle, almond-shaped, and pointed.
What are the popular nail colours for 2021?
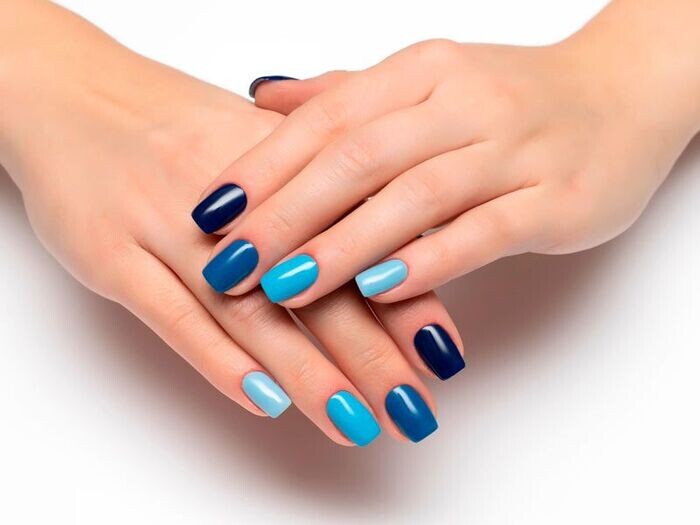
Popular nail colours for 2021 are dark red, brown, bluish-grey, cyan, nude, navy blue, and a metallic finish.
bePOS – Spa & Salon Management Software Highly Recommended To Use

bePOS is one of the most favourable POS systems for more than 10 countries around the world. The spa & salon software is integrated with many features to support the management process of spa owners. Moreover, it is connected directly with customers through personal information data, gathering customer feedback. From there, the salon can conduct professional customer care services that meet their needs. bePOS contains outstanding features of a POS system to support managers:
- Booking Management
- Cloud-Based
- CRM
- Report
- Inventory Management
- Cash Management
- Staff Management
- Treatment Management
Spa & salon management software is designed to automate the spa business and beauty parlour’s day-to-day activities. It enables the spa managers to run their business, manage their daily schedule, appointment booking, staff, and inventory with just a button click. These functions help the salon owners save their time and save their money in the operation process.
Let’s bePOS become your best assistant right now!
Follow bePOS: